


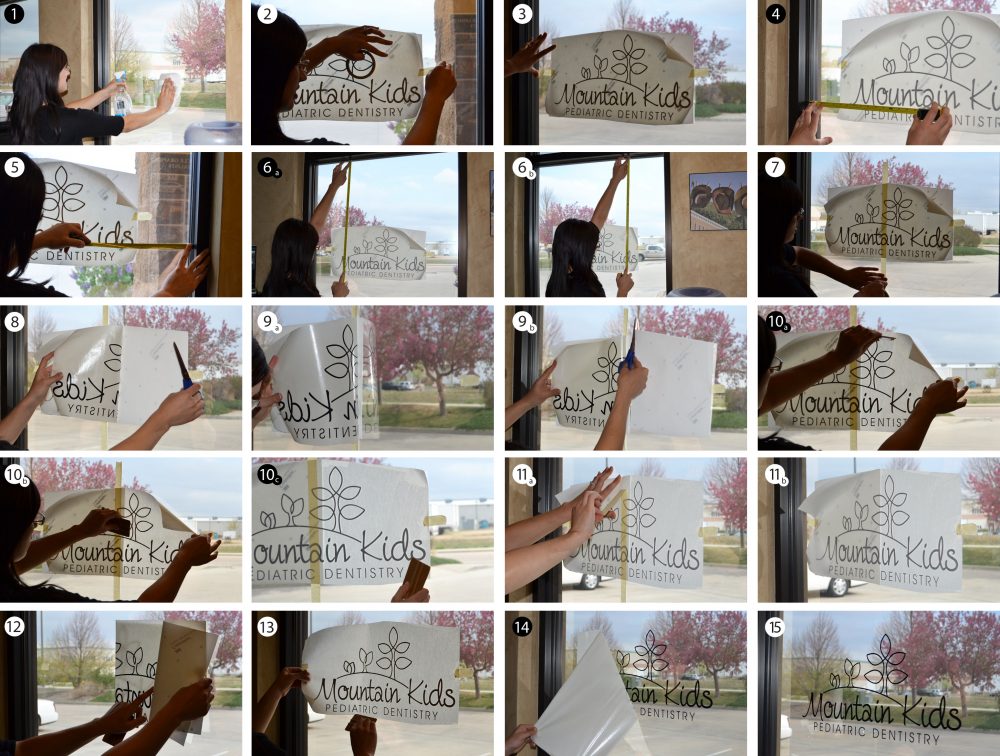
Graphic Installation Instructions
Do you need some cut vinyl lettering or graphics on your car or storefront windows? For example, you might need some USDOT numbers to put on your truck – but you really don’t want to pay to have them installed. How hard can it be…right? Or, you’re just starting a new business and it would be helpful to install your logo graphic and business hours on your own. Well, it’s your lucky day. We want to give our customers the chance to give it a shot, especially if money is tight or you just want to learn something new. It really isn’t too difficult, so take a deep breath, relax and we’ll coach you through the installation process step by step. If all else fails, we’ve got your back and can do the install for you. Hey, at least you tried!
Materials:
- Windex or another type of glass cleaner
- Paper Towels
- Scissors
- Squeegee (e3 may need to provide you with one if you don’t already have one)
- 1″ masking tape
Installation:
- First – you’ll need to do is wipe down your window with glass cleaner.
- Grab your graphic and place it on the window approximately where you want it.
- Use tape on the right and left side to hold it in place.
- Measure the farthest edge of the lettering or graphic from the left side – to the left side of your installation surface area.
- Measure the farthest edge of the lettering or graphic from the right side, to the right side of your installation surface area. Your goal is to have an even measurement on both sides to ensure the graphic is centered.
- Once it’s centered on the right and left, you’ll need to measure vertically to ensure the graphic is straight from top to bottom. In our example, we used the bottom of the last line of text to the top of the window frame. Be sure to measure from the bottom of the first letter in the line of text and the bottom of the last letter to the top of the window.
- Once all of your measurements are in place, run a strip of tape vertically through the center on your graphic.
- From there, you’ll want to release the tape on the right side and pull back half of the graphic.
- While holding up half of the graphic of the window, peel off the backing paper and cut the backing paper off with scissors.
- Continue to hold the graphic up off the window and use your squeegee, (starting next to the centerline of tape) start putting down the graphic. You’ll want to start with the top half of your graphic by pressing down with the squeegee and swiping upwards. Then swipe the bottom half moving the squeegee downwards. As you continue this motion, you’ll be gradually letting the graphics lay down onto the window. Keep swiping upwards and downwards until the graphic is completely down on the right side.
- Remove the center line of tape.
- Peel off the backing paper while holding the left half of the graphic of the window.
- Repeat the steps in number 9 using the squeegee to lay down your graphic on the surface.
- Once the graphic is completely applied to your desired surface, peel off the masking tape and…
- Viola!! Step back and admire your nice work!
Easy Fixes:
If there are some bubbles trapped underneath the graphics and you have an xacto knife, a straight pin or a safety pin (even a razor blade would work) you can poke a small hole and work the air out by pressing the bubble flat down on the surface with your finger.
Don’t have a squeegee and don’t want to buy one? Try a CD case. It might work just fine. We recommend an actual squeegee of course, but it’s amazing what you can get by with when you get creative.
Call us at the shop ANYTIME if you have any questions.
